Are you interested in How to Reset all Audio Settings in Windows 11? Setting the audio in Windows 11 which is also resetting the volume for your apps. Setting audio on your Windows 11 is quite different from every other window. After the whole setting change, you have to restart your system for the effect to show.
There are a lot of options to reset the audio settings in windows 11.
How To Reset All Audio Setting In Windows 11
To reset your audio, follow the steps below:
- The First step, is to right-click on the speaker icon on the taskbar close to the clock and choose Sound settings to change the current setting to your choice.
- Then click on volume mixer, after clicking on the advanced section.
- After choosing the volume mixer, at the bottom of the screen, you click on reset.
With these steps, you can reset the audio in your Windows 11.
Another method is using the windows key:
- The first step is to press windows and I together to open the settings options.
- Next is to click on the sound option at the right. The sound option is under the System option.
- After clicking on the sound option, you would see different options. Click on “Volume Mixer”.
- You click on the “reset” option at the bottom of the page.
Troubleshoot your Audio Driver
This is another way to reset your audio driver and it is quite different from the above option. This is the following step:
- You hold onto the windows, + and x on your keyboard and you choose the Device manager option.
- When you click on device manager, you would different options, choose the “sound, video and game controllers” option.
- Before you can go to this next step, you have to know what audio adapter is having issues so you can choose from one of the options you see.
- Now after you have clicked on the audio adapter, you would see a page pop up. Click on the driver option at the top of the page you would see it.
- Next click on the “Uninstall device” button.
- Click the checkbox to accept the option of attempting to remove the driver for this device.
- The Last step is to click on Uninstall.
After successfully following up on these steps, you have to restart your system to force Windows to reset back to the default OEM driver that is if you have a default OEM driver. With this, your windows will automatically reset audio and fix other options.
Using the Device Manager to Update Audio Driver
Using the device manager to update the audio driver is different from other steps, follow me:
- Press windows, + and R to open the run dialog box.
- On the search bar, type in devmgmt. MSC and click OK to open the device manager.
- Scroll through the option till you see the audio inputs and outputs. Double-click on that option.
- Right-click on the audio output device and choose the Update driver option.
- You would see different instructions, make sure to follow them to successfully update your audio driver.
Restart Windows Audio Service
To begin you click on the Windows logo to get to the start menu. Follow me to restart the windows audio service:
- When the Start menu shows, you type in Services in the search bar.
- Scroll down till you see the Windows Audio option.
- After seeing the option you click the restart option.
- To finalize the process click on the Yes option.
The Roll Back Option
To get your driver to the previous version you follow the steps below:
- You hold onto the windows, + and x on your keyboard and you choose the Device manager option.
- When you click on device manager, you would different options, choose the “sound, video and game controllers” option.
- Before you can go to this next step, you have to know what audio adapter is having issues so you can choose from one of the options you see.
- Now after you have clicked on the audio adapter, you would see a page pop up. Click on the driver option at the top of the page you would see it.
- Then you would see various options, click on the roll-back driver button.
FAQ
How do I reset my default audio settings in Windows 11?
- Navigate to the settings and click on sound, then scroll through and click on more sound settings.
- You would see the different audio output and input devices.
- Click on the Advanced options, under the advanced you would see the restore defaults at the bottom of the page.
How do I reset all my audio?
To reset all audio, you have to follow the steps below:
- Click on the start menu or the Windows key on your keyboard.
- Then on the search bar, type in Sound.
- Under the sound settings, scroll through to the reset section.
- Then click on the reset button to reset all your audio.
How do I reset my volume mixer in Windows 11?
- Click on the Windows + s to get to the sound settings.
- Click on the right arrow next to the sound device.
- Under enhanced audio, click on the advanced option.
- The window would pop up, click on the advanced button.
- Then try going back to check the issue if it is still there.
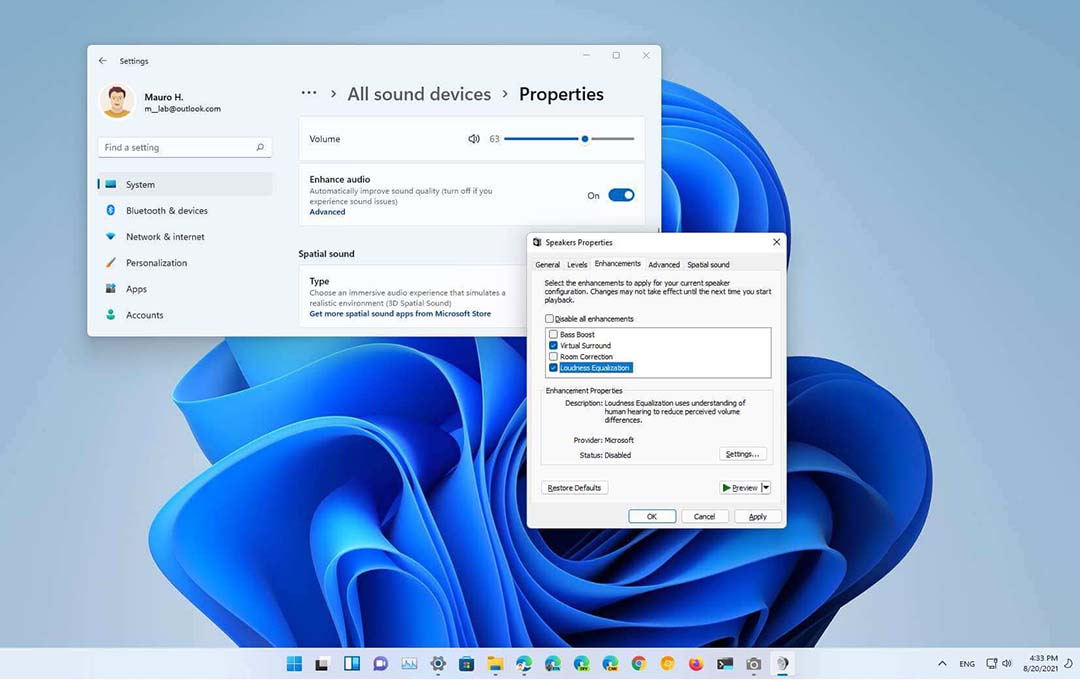
How To Fix Sound Quality in Windows 11?
In able to enable audio enhancement and Spatial audio follow the steps below:
- Click on Windows + X which would lead you to system settings. Under the system setting select Sound.
- Scroll below and click on an advanced section to select sound devices.
- Then select or choose the audio device that you would upgrade its sound quality.
What audio format is best for Windows 11?
The popular spatial sound formats are Dobly Access and DTS Sound Unbound. You can download the spatial sound formats from Microsoft Store and configure them to make them function with your PC. And the formats are premium tools, which means you would need a license to make use of them.


