Here I would be giving you the steps you need how to fix Joy-Con drift on Nintendo Switch. Fixing the Joy-Con drift is a question that hundreds of Nintendo Switch owners asked during their time with their console since it has been a circulating issue since it was launched. And despite the number of times the switch and its accompanying consoles sell out, this issue still did not change.
Joy-Con drift occurs when the Joy-Con’s thumbstick detects movement, even when the player is not touching the Joy-Con. During gameplay, Characters can wander off, select items, and struggle to make the right moves.
How to Fix Joy-Con Drift on Nintendo Switch
While the Switch owners fail to purchase new Joy-Cons as a pricey solution, the Nintendo Switch Lite, unfortunately, does not carry a detachable Joy-Cons. Joy-Con drift is such a widespread issue that Nintendo’s president, Shuntaro Furakawa, made a rare move to apologize for its troubled products, and even addressed the ongoing US class-action lawsuit over drifting Joy-Cons.
So, let’s hope this doesn’t happen with the Nintendo Switch 2! In the meantime, we’re here to show you how to fix your Joy-Con drift at home and not let the best Nintendo Switch games ruin your time. Keep in mind that tinkering with the Switch’s internal components can be dangerous and even void your warrant.
Update Your Joy-Cons
The first step in attempting to correct Joy-Con drift is to update your devices. With both Joy-Cons connected to the main console, go to “System Settings.” To access “Update Controllers” and “Controllers and Sensors,” press the A button. This ought to guarantee that the most recent Joy-Con firmware has been installed
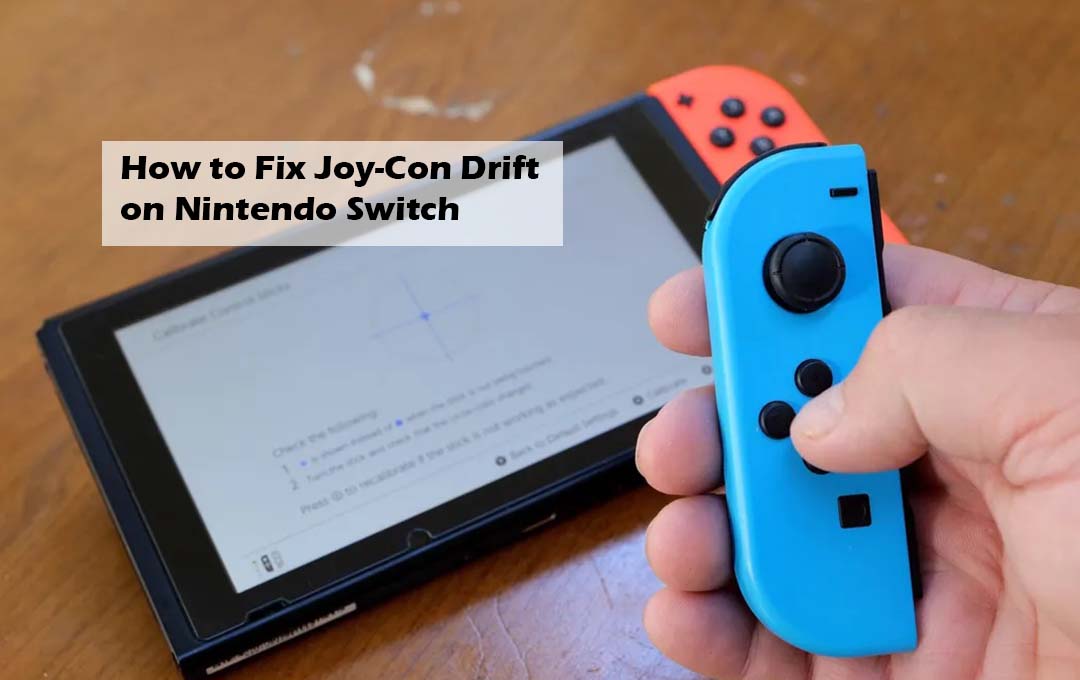
Recalibrate Your Joy-Cons
First Detach your Joy-Cons straight from the main console and then recalibrate them one at a time. First, you would need to head over to the “System Settings’. Select ‘controllers and Sensors’, then ‘calibrate control sticks. This would take you to a series of simple tests, which can be quite sticky if your Joy-Con is not cooperating.
The very first test that you require is to check the responsiveness of a floating point in a reticle. The point should pop up as a ‘+’ when the thumbstick is not being touched, When you turn the thumbstick, the edge of the reticle’s circle should change to green. If the Joy-Con thumbstick is not working correctly, press the X button to recalibrate the Joy-Con.
The Next test happens to involve a more details point and reticle. Push the stick towards the triangular arrow and release it when the triangle Changes color. You would have to perform this same task at all four cardinal points of the reticle in other to complete the test.
Clean The Joy-Con Thumbstick
This is the easiest and least invasive method for resolving Joy-Con drift. A few Q-tips, electronic contact cleaner (or isopropyl alcohol), and possibly a small set of tweezers are all you’ll need. Examine the tiny rubber cover located just below the “head” of your Joy-Con thumbstick. Tweezers are useful for removing a small rubber “skirt” that prevents dust and other particles from getting inside the mechanism.
Apply some contact cleaner to the Q-tip’s head and gently but firmly press it into the rubber layer. Rotating the Q-tip at different angles will help you get rid of as much dirt as possible. Even though contact cleaner is designed for use on electronics, you should only use a small amount to avoid drowning your Joy-Con. After you are finished, wait a few minutes for the Joy-Con to dry before turning the thumbstick a few times to ensure that the remaining cleaner is distributed as evenly as possible.
If you’re worried about getting Q-tip dust on your Joy-Con, you can also carefully spray the contact cleaner directly beneath the rubber layer. The same procedure can be followed with a can of compressed air.
Contact Nintendo for Free Repairs
If everything fails, the safest course of action to fix your Joy-Con is to head to the Nintendo Support Website to see if you are eligible for a free repair or replacement. In some situations, Nintendo would offer refunds for paid repairs.


