Do you know How to Replace a Timing Belt? This is easy and yet complicated. However, with the help of an expert, it can be done in minutes. If you however wish to know how replace a timing belt all by yourself, then you will find this post very handy.
How to Replace Timing Belt
Timing chains normally on vehicles last for the entirety of a vehicle in terms of the life cycle. But this is not so with timing belts. Timing belts need to be replaced at every 60-100k-mile interval. This is because a failing timing belt can be disastrous.
The Importance of Replacing a Timing Belt
Replacing a timing belt is very important. When you run a search on Google you may find articles citing that the replacement of a timing belt may cost up to a thousand dollars. And thinking about it, that’s a pretty hefty fee for a simple and affordable part. And just in case you are ready to get your hands dirty you may be able to get the job done all by yourself.
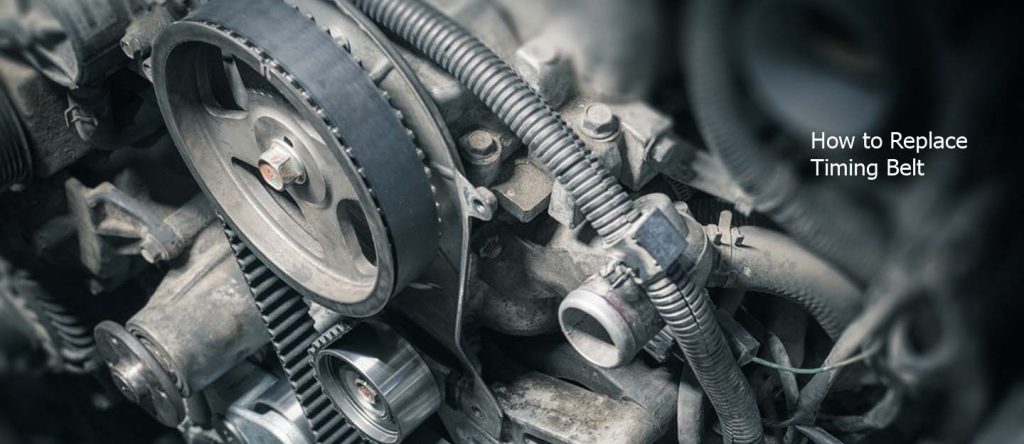
The timing belt as you should know help connects the crank and camshaft gears, and in the process keeps them spinning in exact alignment all so that the engine can work well. Most of the engines with a timing belt are interference engines. This simply means that they keep the valves and pistons out of each other’s way with impeccable timing. While this is an efficient and effective design, a broken timing belt will result in valve and piston contact. This ultimately means extensive and expensive engine damage.
it is recommended on most vehicles not only to replace the timing belt but also many related parts when undertaking this job. many vehicles usually will have a timing-belt kit that will consist of a water pump, tensioners, idlers, and other parts that are needed to complete this job. This is a long and hectic job to complete, so it’s best to only do it once.
What you will Need to Replace a Timing Belt
Before you undergo the steps of replacing a timing belt, there are a number of things that you will need to first get. These things will need to be at your side when you begin the task and they are;
- A timing belt kit or a new timing belt.
- Drip pan
- Socket set.
- Set of screwdrivers.
- Gloves
- Puller
- Motor oil.
- Shop towels
- Repair manual
- Flashlight
- Timing cover gasket
- New water pump.
That’s it!
How to personally Change a Timing Belt
To change or replace a timing belt successfully, follow the steps below;
- First, you need to make sure that the engine is cold to the touch. Give your engine time to cool off so that all parts and fluids are at air temperature.
- Next, you will have to disconnect the negative battery terminal and remove the air intake hose and set it aside.
- Remove the radiator cap and then disconnect the lower radiator plug. Doing this will drain it into a catch pan.
- Drain the engine oil and then store all fluids for later recycling.
- Remove the serpentine belt and then use a puller to take away the crank pulley.
This next step will vary based on the model.
- After you have successfully removed the crank pulley, some engines will have clear access to all the timing belt cover bolts while others will require the removal of engine accessories such as the power steering pump, the alternator, the water pump, the radiator, and fans needed for clearance. You should clear all of the accessories until you get to see all the bolts for the timing chain cover.
- You also may have to remove or take away what is known as a motor mount for you to gain access to the entire timing cover. You should use a jack with a jack pad or a wooden block to cradle the engine from under and then remove the motor mount.
- You should now remove all sensors on the timing cover if there are any such as the cam sensor or the knock sensor.
- Take away all the bolts from the timing belt cover and then separate the timing belt cover from the block. In the vent that it is stuck, you should make use of a rubber mallet, tapping gently on the side to remove it.
- You should repair manuals by rotating the engine to the top dead center. So that you can make use of the timing marks on the crank and the cam gears in installing the new belt without having to lose proper alignment.
- Take note of the path of the belt around the pulleys and gears. If possible you should take a picture with your phone if the whole thing is complicated. You should now loosen the belt tensioner pulley and let the timing belt to slip off. Normally, your service manual may recommend that you change the belt tensioners and idlers and then install a new water pump at this time. You should do well to follow the instructions in the manual.
- Now slide the new timing belt onto the gears and pulleys and then follow the same path as before.
- Before you start with reassembling, you should put the crankshaft bolt back into the crankshaft threads and then make use of a long handle ratchet or a wrench to rotate the engine. This should make the engine internals spin freely without any clearance issue. And after two revolutions, you should do well to check to make sure that the timing marks are still in alignment.
- You should clean the timing chain cover all over. Scrape off any old gasket material and then wipe off with a degreaser on a shop towel. Make use of a star pattern when you are installing timing cover bolts and torque only to the things that the repair manual requires. You should also know that over-tightening of fasteners can help to deform the cover and in the process cause leaks.
That’s it. You should reassemble by following the above instructions reversely.


