There are sometimes where an Android Phone Set Up might be a difficult task, especially for old users. Android has been the most known operating system for smartphones worldwide.
This we know is changing as another operating system like iOS is taking over the markets. But yet if you would like to get an Android phone then its all good. Setting it up shouldn’t hold you back.
In this article, I will be giving you a guide on how to get your Android Phone Set Up ready. Enjoy reading and get more information and guidelines on Android Phones.
Android Phone Set Up
The Android Operating System is getting more complex each day due to upgrades. The latest version of the Android Operating System is version 11. And version 12 is already been talked about, so we should expect it soon.
Immediately you have gotten your new Android phone, the very first thing is getting it set up. After this, you can begin to use and access other features of the phone like making calls, Facebook, etc.
Android Phone Set-Up is easy and straightforward. But if you still get confused about a step, then here is a guide to assist you to set your phone up:
How Do I Setup My Android Phone
Take note that there are different models of Android Phone been produced. So, each Android Phone might have a slightly different setup.
But my guide will be functional as it can be used to set up most Android Phones systems.
Insert your SIM card:
This is the very first step to take whether starting over with a new phone or transferring to an old one. Just be sure to locate the SIM inserting slot and get your SIM well placed for your device to install it.
Connect a Wi-Fi network:
This isn’t really necessary. But consider getting the phone operating will take a few megabytes. And most cases, it is required to get connected to Wi-Fi. After connecting to Wi-Fi, tap on NEXT from the bottom of the screen.
Import your backup date (optional)
Getting a new phone doesn’t really mean your old files are lost. Some users are used to backing up their data. And this is a good means of keeping your file online to be recovered whenever you want.
You can decide either to copy your data from your old backup or set your device as a new one. If you decide to bring back an old backed update, then select whether to bring the data from:
- A backup from an Android phone.
- A Backup from the cloud.
- An iPhone device.
Then enter your backup details which may include your email then your backup restoration will begin. Note it might take a while depending on how large the backed-up files are.
Some phones may allow the option of restoring backup via a cable. So, you can easily plug in your cable to the backup location (e.g., PC) then select the location and restore.
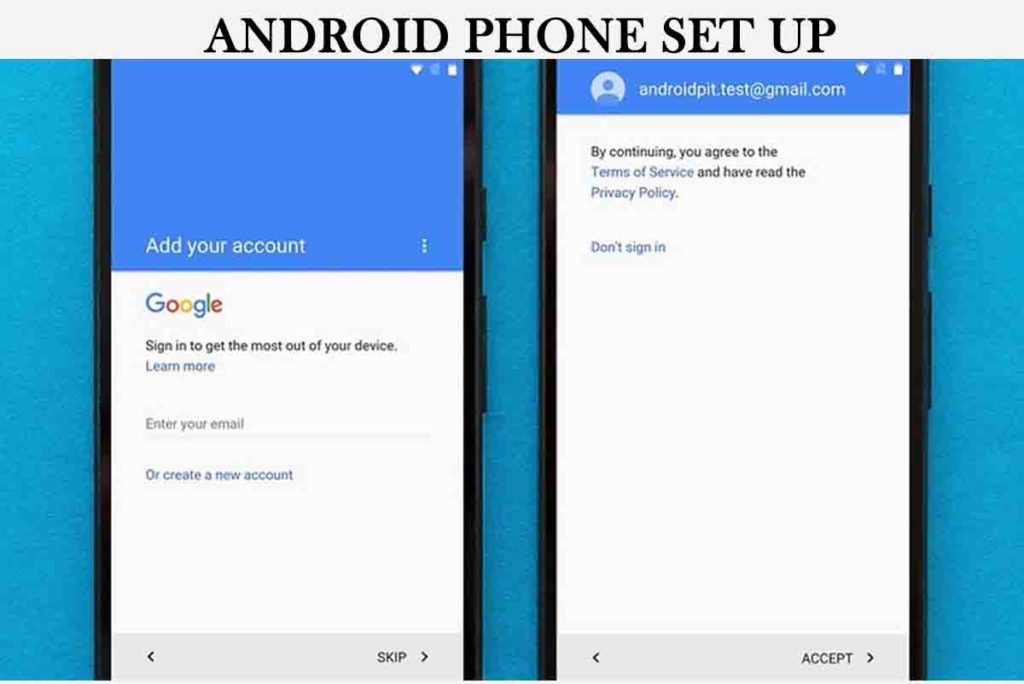
Sign in to your Google account
If you have selected to restore a backup, then your device has already gotten a Google account. You might be required to enter your password again. But if you skip the restore backup process, then you will be required to enter your Google Account and password. You can as well skip it or create a new one.
Scroll down and accept Google’s privacy and terms to continue your Android Phone Set Up.
Set up security
This is the option that lets you put a lock to your device. It is very important to keep your device secured with a security lock especially when there are important files saved in it.
The most commonly used security options for all Android phones are:
- Set up intelligent scan.
- Set up Face recognition.
- And Set up Iris Scanner.
- Set up Fingerprint Scanner.
- Set up PIN, pattern, or password (which is mostly used by users).
You can as well decide to skip the protect your phone phase.
Activate additional services
At this point, you can decide whether to set up voice-activated Google Assistant. Or other Google services on your new or recovered Android phone.
After checking on the services, you can then tap on getting STARTED.
More Related Content
- Android 12 – Android 12 Availability and what to Expect
- Crowd1 App – Crowd1 App Download for Android free
- BitPay for Android – BitPay Online Payment and How Does it Work
- WhatsApp Update 2021 – How To Update WhatsApp on iPhone and Android Device
- FaceTime App – FaceTime Download | FaceTime for Android


