This article is a guide on how to enable the Disney Plus Parental Control. Disney Plus has made available the new parental control features for the Star launch.
Star is out now on Disney Plus, bringing with it a huge load of popular films and tv shows from the Hulu library within the US.
Disney Plus Parental Control
The addition of Star content however implies that Disney Plus will include series and films not family-friendly, like Deadpool 2.
So, if you’ve got kids at home and need to keep them from accessing these kinds of things, then you’ll have to know how to set on the parental control features.
We’ve put together all the information you would need to know to enable these features.
How To Enable Parental Controls in Disney+
Disney+ subscribers are given the option to opt-in for Star content from their first time log in after the launch on 23rd February. And Star content means TV shows and films with a 14+ rating or above.
Disney has confirmed that the experience for setting the parental controls is the same across all devices. The account saves your settings to every one of the devices you’ve got Disney+ on. This means that you simply need to set parental controls once.
If, however, your household has multiple Disney+ accounts, then you’ll have to change the settings on each account.
How to opt-in/out of Disney+ Star content
You’ll have the choice to enable or disable Star content from the first time you log in after 23 February. Here’s what you are required to do:
- Launch the Disney+ platform and choose your profile. When the Star page pops up, select ‘Continue’.
- Click on “FULL CATALOGUE” if you want movies and 18+ rating. Otherwise, click on “Not Now”.
- Then confirm your choice by entering your password to verify.
- For first-time access, click on CREATE PROFILE PIN.
- Now, select the age rating for movies and shows for other profiles on your account if shared.
If these options are skipped, then your library will be set to the default of 14+ rating automatically.
How To Set Age Rating for the Disney+ Library
Here are the steps you should take:
- Launch Disney+.
- Click on your profile icon and choose ‘Edit Profiles’ from the displayed options.
- Choose the profile you would like to edit.
- Under the ‘Parental Controls’ section, select the arrow next to ‘Content Rating’ and enter your password.
- Select the content rating you would like for your film and television library. You’ll be able to choose between 6+, 9+, 12+, 14+, 16+, and 18+.
The library and search functions will now only display titles specific to those ratings. And you can change the rating any time from within the settings.
How to set a profile PIN
Follow the steps below to set up your Disney+ profile pin:
- Launch the Disney+ platform.
- Click on your profile icon from the top and choose ‘Edit Profiles’ from the displayed options.
- Choose the profile you would like to edit.
- Under the ‘Parental Controls’ section, select the arrow next to ‘Profile PIN’.
- Set a four-digit PIN and ensure your choice by entering your password.
And your profile pin is all set up.
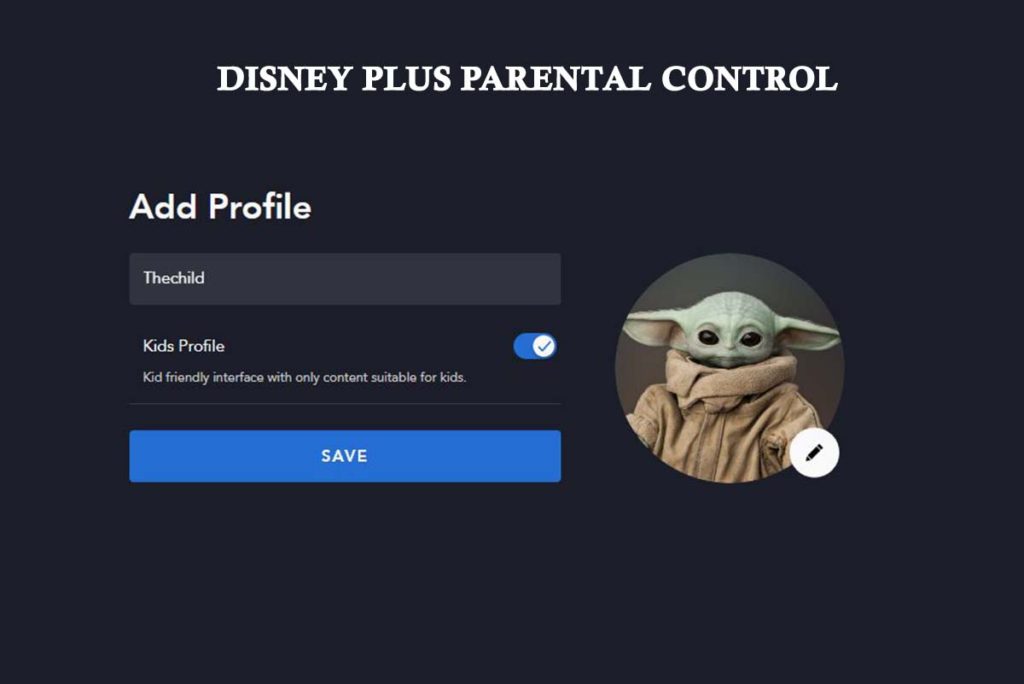
How To Set a Childs profile
Finally, you can also be able to set up a child profile on Disney Plus. This changes the look and layout of Disney+ to be tailored for younger audiences.
It allows only broadcasts content below a 7+ age rating and without a content warning. You can create a Kids profile by doing the following:
Open Disney+
- Click on your profile icon and choose ‘Edit Profiles’ from the dropdown menu.
- Confirm the profile you would like to edit.
- Under the ‘Parental Controls’ section, move the children’s Profile slider to on (it turns blue).
- Enter your password to verify your changes.
And that’s it. More research can be done on Google.
More Related Content
- Disney Stock: Disney Stock Technical Analysis
- Disney Plus Now Available on Roku – How to Install Disney Plus on Roku
- Disney Plus Price – How to Get Disney Plus for Free
- List of Star War Movies In Order: Star Wars Movies Disney Plus Account –…
- Disney Plus – Stream Disney, Marvel, Pixar, Star Wars, National Geographic


